


I'll be honest: I initially wanted to describe all collections available in Rust as well as their related concepts. Then, I started to dig a bit into it, and I decided it would have been (much) too long. For that reason, I'll restrict the scope to the Vec type.
- My first cup of Rust
- My second cup of Rust
- The Rustlings exercises - part 1
- The Rustlings exercises - part 2
- Rust on the front-end
- A Rust controller for Kubernetes
- Rust and the JVM
- diceroller, a sample Rust project
- Rust’s Vector (this post)
Here's the diagram we will dive into:
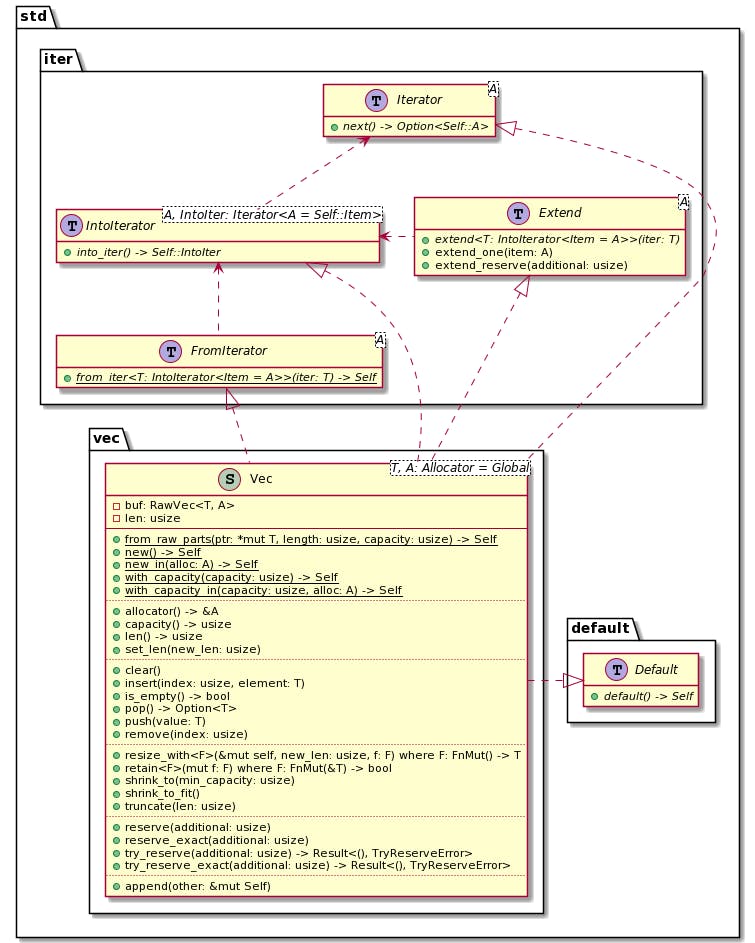
Basics of Vector
From the documentation:
A contiguous growable array type, written as
Vec<T>and pronounced 'vector'.
Just as with Java's ArrayList, Vec is backed by an array. When the array reaches full capacity, Vec reserves a new array with more capacity and copies elements from the original array to the newly-created one. Then, it frees the former. Note that the collection may allocate a larger array than necessary to avoid frequent reallocations.
To add values to a Vec, we need to use an additional step, e.g., the push() function:
let mut v = Vec::new();
v.push(1);
v.push(5);
Functions that create new Vec initialize them with no items. If we want to create a Vec and values simultaneously, Rust offers the vec! macro. We can replace the above code with the following one-liner:
let v = vec![1, 5];
At that point, if you've already dabbled a bit in Rust, you probably learned nothing new. Instead of describing every function on Vec - they are pretty similar to those found in other languages - let's explore around a bit.
Vector and Iterator
Iterator is a design pattern described in the classic Design Patterns: Elements of Reusable Object-Oriented Software book:
Intent: Provide an object which traverses some aggregate structure, abstracting away assumptions about the implementation of that structure.
Though the book describes Iterator, nothing limits the pattern to OOP languages. It's a pretty widespread abstraction.
Rust provides the Iterator trait, and Vec implements it. Hence, we can traverse its values:
let v = vec![1, 5];
let mut iter = v.iter();                       // 1
loop {
    let value = iter.next();                   // 2
    if value.is_some() {
        println!("value: {}", value.unwrap());
    } else {
        break;
    }
}
- Create the iterator. Because calling
next()changes the state ofiter, it must be mutable. - Get the next value
If I had received a dollar for each bug originating from a misplaced break statement, I'd surely be rich now. If you break too early, you lose values; too late, and all hell breaks loose (pun intended). For that reason, for along with iterator is a better fit. We can rewrite the above code as:
let v = vec![1, 5];
for value in v.iter() {                        // 1
    println!("value: {}", value);
}
- Shorter, safer, hence better
Too many iterators to iterate from
Interestingly enough, we can slightly change the above code to remove the call to iter(). It still works!
let v = vec![1, 5];
for value in v {                               // 1
    println!("value: {}", value);
}
- Magic!
That's actually not magic but Rust' syntactic sugar in action. for loops accept iterators. Yet, some instances can be transformed into iterators "on the fly". The type must implement the IntoIterator trait and its into_iter() function to be eligible. As seen from the diagram above, that's the case of Vec.
If you ask yourself the difference between iter() and into_inter(), take comfort in the fact that I wondered as well.
After some research, I found this brilliant answer:
TL;DR:
- The iterator returned by
into_itermay yield any ofT,&Tor&mut T, depending on the context.- The iterator returned by
iterwill yield&T, by convention.- The iterator returned by
iter_mutwill yield&mut T, by convention.
Finally, you can create a Vec from an Iterator thanks to FromIterator.
struct Foo {
    count: u8
}

impl Iterator for Foo {                           // 1
    type Item = u8;
    fn next(&mut self) -> Option<Self::Item> {
        match self.count {
            0 => {
                self.count = self.count + 1;
                Option::Some(1)                   // 2
            }
            1 => {
                self.count = self.count + 1;
                Option::Some(5)                   // 2
            }
            _ => None                             // 2
        }
    }
}

let i = Foo { count: 0 };
let v = Vec::from_iter(i);                        // 3
for value in v {
    println!("value: {}", value);
}
- Implement our own
Iterator - First, return
1, then5, then nothing - Create a
Vecfrom our iterator
Memory allocation
We have overlooked one aspect of Vec so far: the definition is actually Vec<T, A: Allocator = Global>. While T is the type of items that the Vec contains, we didn't look at A, which is what allocates memory. I won't describe the subject in much detail because I currently lack the relevant knowledge. Yet, I believe it's interesting to mention it, as no other language I know about provides this kind of hook.
An implementation of
Allocatorcan allocate, grow, shrink, and deallocate arbitrary blocks of data described viaLayout.
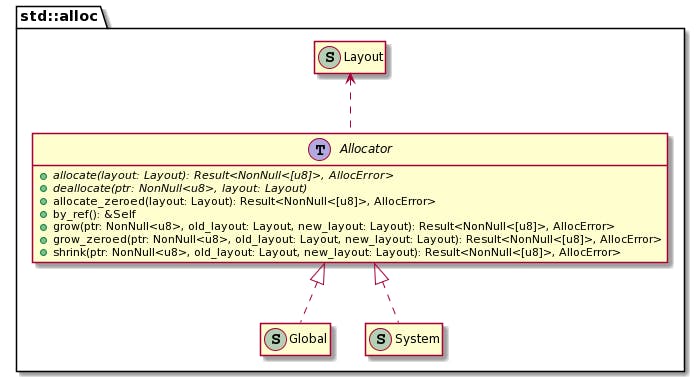
Rust uses the Global memory allocator by default. It delegates to another allocator: it's System unless you register one with the #[global_allocator] attribute.
With Vec<T, A>, it's thus possible to use a different allocator than the one defined centrally. One possible use-case would be to create an allocator that keeps track of allocated bytes only for a Vec instance.
Conclusion
This concludes my dabbling in Vec. In this post, I tried to avoid the usual handling of this kind of post and explore a bit around. While a dedicated memory allocator won't be necessary in most cases, I think it's one good trick to keep in mind just in case.
To go further:
- Module std::collections
- Storing Lists of Values with Vectors
- Struct std::vec::Vec
- What is the difference between iter and into_iter?
Originally published at A Java Geek on August 8th, 2021